

Airbrush Ergonomics: Your Guide to Pain-Free Artistry
As artists, we pour our hearts and souls into our work, often losing track of time as we become immersed in the creative process. But what if I told you that your passion could be causing you physical pain? As a veteran airbrush artist with over four decades of experience, I’ve learned that the key to a long, fulfilling artistic career lies in mastering techniques and how we use our bodies while we create. Welcome to the world of airbrush ergonomics: the scientific approach to pain-free artistry. I’m going to put a Zen twist on it so it sticks.
Why Ergonomics Matters in Airbrushing
Ergonomics might sound like a dry, scientific term, but for airbrush artists, it’s the secret ingredient to creating stunning art without the aches and pains. It’s about designing your workspace and adjusting your techniques to work with your body, not against it.
Many artists, especially beginners, fall into habits that can lead to discomfort and even long-term injuries. Hunched shoulders, cramped hands, and strained necks are all too common in our field. But here’s the exciting part: when we work with our bodies instead of against them, we open up a whole new level of artistic flow. It’s like unlocking a superpower you never knew you had!
The Science Behind Proper Airbrushing Posture
Let’s get a little scientific for a moment. Studies have shown that artists, including airbrush artists, are prone to repetitive strain injuries. These occur when we repeat the same motions over and over in less-than-ideal positions.
When we hunch over our work, we’re putting unnecessary strain on our back, neck, and shoulders. And when we grip our airbrush too tightly, we’re asking for trouble in our hands and wrists. But when we sit or stand with proper posture and hold our airbrush with a relaxed grip, we’re allowing our body to work as it’s designed to. This not only prevents pain but also improves our control and precision.
Creating Your Ergonomic Airbrush Workspace
Think of your workspace as the stage for your artistic performance. Here’s how to set it up for success:
- Chair and table height: Your work surface should be at a height where your elbows are at about a 90-degree angle when you’re working, whether you stand or sit. This promotes a neutral spine position and reduces strain on your shoulders. Try not to slump from your shoulders. Use your core and keep your back in a comfortably neutral position.
- Lighting: Good lighting isn’t just about seeing your work clearly – it’s about reducing eye strain. Natural light is best, but if that’s not possible, invest in good quality, adjustable lighting that illuminates your work without causing glare.
- Tool organization: Arrange your tools so they’re easy to reach without stretching or twisting. This might seem minor, but over hours of work, it makes a big difference in reducing unnecessary movement and strain.
The Art of Holding Your Airbrush
Your airbrush is your primary tool, and how you hold it can make or break your ergonomic practice. Here’s the secret: hold your airbrush with a light touch. Imagine you’re holding a small bird – firm enough that it doesn’t fly away, but gentle enough not to hurt it. This relaxed grip reduces tension in your hand and wrist.
To keep your hands and fingers flexible, try these simple exercises:
- Finger stretches: Gently straighten and bend each finger
- Wrist rotations: Slowly rotate your wrists in circles
- Handshakes: Shake out your hands as if you’re air-drying them
Remember, a relaxed hand is a creative hand. Tension is the enemy of both comfort and artistic flow.
Body Positioning for Different Airbrushing Techniques
Whether you prefer to sit or stand while you work, maintaining good posture is key. If you’re seated, make sure both feet are flat on the floor. If you’re standing, consider an anti-fatigue mat to reduce strain on your legs and back.
When working on larger pieces or unusual surfaces, be mindful of how you’re positioning your body. It’s better to move your body or your work surface than to twist yourself into uncomfortable positions. Your future self will thank you!
Here’s an example below of me using an easel that is too low. Notice how I bend from the neck and waist towards the art?
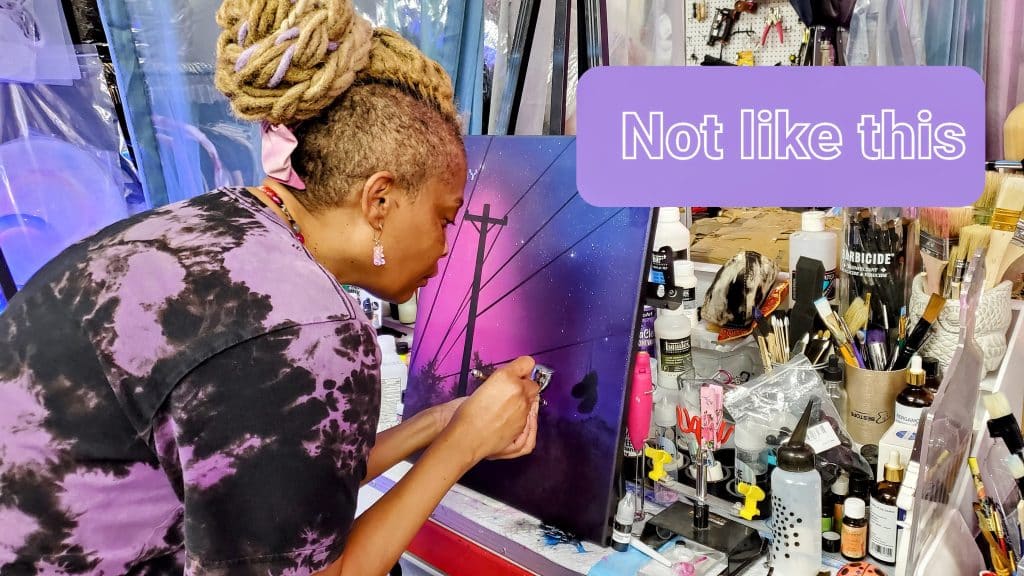
Making this bad posture a habit causes a slouch that could contribute to pain and permanent posture issues. Ouch! This piece should be at a level where I don’t have to bend over like in the image below.

Notice my elbows are at a roughly 90-degree angle, my shoulders are back and my core is engaged. That basically means I’m using my abdominal muscles to balance my stance and protect my back.
The Power of Breaks and Stretches
I know, I know – when you’re in the flow, the last thing you want to do is take a break. But trust me, regular breaks are crucial for both your body and your creativity. Set a timer if you need to, and take short breaks every 30 minutes or so. Use this time to stretch, move around, and give your eyes a rest from close-up work.
Try these simple stretches during your breaks:
- Shoulder rolls: Slowly roll your shoulders backward and forwards
- Neck stretches: Gently tilt your head from side to side
- Back twists: Sitting in your chair, gently twist your torso to each side
These breaks aren’t just good for your body – they can actually enhance your creativity by giving your mind a chance to reset and refocus.
Mindfulness: The Key to Body Awareness
This is where our practice of Zen Airbrushing really comes into play. By increasing our body awareness, we can catch and correct poor ergonomic habits before they cause problems. Try this simple body scan meditation:
- Close your eyes and take a deep breath.
- Starting from your toes, focus your attention on each part of your body, moving upwards.
- Notice any areas of tension or discomfort.
- As you exhale, imagine releasing any tension you’ve found.
By regularly checking in with your body this way, you’ll become more attuned to tension or discomfort as it arises, allowing you to adjust your position or take a break when needed.
The Long-Term Benefits of Ergonomic Practice
Adopting these ergonomic practices isn’t just about preventing pain – it’s about extending your artistic career and enhancing your enjoyment of the craft. When you’re comfortable, you can focus more fully on your art, leading to better results and a deeper sense of satisfaction.
I’ve seen artists transform their practice and reignite their passion for airbrushing simply by making these ergonomic adjustments. It’s truly powerful stuff.
Conclusion: Your Path to Pain-Free Artistry
Remember, great art doesn’t have to come at the cost of your physical well-being. By incorporating these ergonomic principles into your airbrushing practice, you’re setting yourself up for a long, enjoyable, and pain-free artistic journey.
Ergonomics is not a one-size-fits-all solution. It’s about finding what works best for your body and your artistic style. Be patient with yourself as you make these adjustments, and don’t be afraid to experiment until you find your perfect setup.
Are you ready to transform your airbrushing practice? Start by making one small ergonomic change today. Your body – and your art – will thank you.
Want to dive deeper into the world of Zen Airbrushing and ergonomic practices? Check out our full video tutorial on the Airbrush With Grace YouTube channel when we post it. Get the notification by signing up with a free membership for exclusive content, including more personalized ergonomic assessments and tips.
Share your ergonomic setups and tips with us using #ZenOfAirbrushing—let’s create a community of comfortable, creative artists together!